Sunday, August 29, 2021

Cloud backup is just get easier in MikroTik Stable release 6.48.4


Since RouterOS v6.44 it is possible to store MikroTik device's backup on MikroTik's Cloud server. The backup service allows you to upload an encrypted backup file, download it and apply the backup file to your device as long as your device is able to reach MikroTik's Cloud server. Below we can find operation details that are relevant to the IP/Cloud's backup service:

* Free backup slot for each device
* Allowed backup size: 15MB
* Sends encrypted packets to cloud2.mikrotik.com using UDP/15252 and TCP/15252 port

In previous the process was fully CLI based but in recent stable release 6.48.4 it gets GUI support in Winbox. It is now available in Winbox Files>Cloud Backup


As MikroTik use it's own Cloud Server and uploaded file can only be Encrypted and now available with GUI. It is much more safe, secure and easy now.

The process is very simple...

Go to Files>Cloud Backup>Upload Backup


If we are doing for the very first time all we need to do..

1. Choose 'Action' "create and upload"
2. 'Name' "Any Suitable Name" [A better choice for name could be device Identity]
3. 'Password' "A Strong Password"

and finally press Start.


After  the process start it will take a very short time to create Backup File and Upload, if no error happened. "Status" will inform the Success or Error report.


Now, let's look at the new cloud file. Remember that, yes we are watching the file but that file is not in this device. It is located on MikroTik Cloud.


So, here is the details of that file. We can 'Download' this file in this device and 'Remove' also. But, still downloading process in another device is based in CLI (I hope MikroTik Team, will work on it in next update). Download file will be available in file menu.

As only 1 slot available for each device, to create a new/updated file old one need to 'Remove/Replace' at first.

 Replace could be possible to do also in the process of creating a new one.


Now look at the the file. The significant change is done in the "Secret Download Key". Each time it will be change in the process.


But, knowing this ''Secret Download Key" is essential to download the Backup File in another device. Let's see it.

So, we are moving to another Router and open a Terminal and put following command.

/system backup cloud download-file secret-download-key=GTsWB1h7URm5VfJmiLyzwkK action=download

Thus, the file from the cloud will be download in another device.


So, it is very essential to know the "Secret Download key".

Notes:

1. As it is not .rsc Backup. Mikrotik recommend to restore the backup in same model device.
2. By scripting and scheduling the process could be fully automated and regular basis.
3. As knowing the "Secret Download Key" is important. To do,

Print the information of file on a text file in MikroTik and sending in Email is essential. The command to Print the file is simple.

/system backup cloud print file="File Name"

By scripting and scheduling the whole process can also be automated.
4. The information is also could be shared through API of Bot messenger of Telegram, Whatsapp and so on...

Thanks for Reading and have a nice day!!!

BR,
Shuvodip


Sunday, August 1, 2021

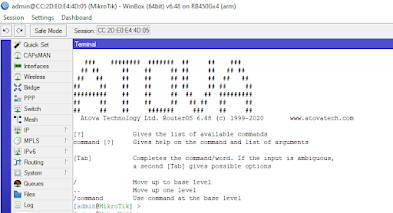
Put your very own sign in MikroTik Teminal


Normally we do not see the Terminal of MikroTik like that. We are actually with very much familiar to this following Terminal.


Yes, this is the very classic MikroTik Terminal. Which comes with MikroTik ASCII Logo and all MikroTik users are very familiar with it. But, you may also change it and put your very own sign as Branding. 

To do it you first need to login in your MikroTik Account. Link: https://mikrotik.com/client

Login if you have account already or register now if you have not. 

After Login you will see in the left side Menu "Branding maker" as given picture.


Click it, it will open another page just like followed.


Now, Put your custom information as following.


For Telnet ASCII Logo you can use this link http://www.network-science.de/ascii/ or similar just like pictured. It is very easy.

Copy that custom created ASCII Logo and paste it and paste it in MikroTik Branding maker "Telnet ASCII Logo" section.

Note: Make sure it is not wider than the form above, or your logo will be distorted.

Now, go little bit down as illustrated. You will find make button. There are 2 options. One for comparatively new RouterOS and another is for older one. As mine was new, I selected the 1st option. You have to do as your one.


Then the custom branding package will be created with .dpk file extension. Now, download this file.


Now, as package is ready, it's time for installation. Login to your MikroTik through Winbox. As like other package installation in MikroTik follow these 2 simple steps. 

=> Upload the package in Files section of MikroTik.

=> Then reboot the system for installation.


After successful reboot, login again and open Terminal. Now, you are watching your Brand Sign with a happy smile. 😀😀😀 


Just not the ASCII logo but you may also can do change in followings by Branding package.

1. Webfig login page

2. Webfig logo

3. /hotspot

4. /skins

5. LCD logo

Where you can put your very own Brand sign. Default configuration can also be edited as like Flashfig through Branding package.

BGP Peer Open-Sent issue in MikroTik and a Solution by BGP monitor

The “Open-Sent” state in BGP (Border Gateway Protocol) indicates that the router has sent an OPEN message and is waiting for an OPEN message...