Tuesday, October 12, 2021

MikroTik launches "expired password"

In recent release 6.49 (Stable) MikroTik lunched "expired password" for user. It is better than never from MikroTik.

Although MikroTik always inspired it's users to change password in regular interval but often users do not follow. But, from now at least Network Administrator may force users to do it. There are no doubt "expired password" is not directly terms of security but certainly this cautious is very effective to ensure security. Mainly it is an Administration policy and it's effectiveness is so high.


As figured, "Expire Password" is added. If Network Administrator click it, the account will be declared as "expired" then in next login the particular user will be promoted to change his/her password as followed.


So, far it's seems good. But, I think MikroTik may do add more to it. Like as, "Expire Password" interval, "Inactive Login Expire" and so on. Then it will become more robust. I hope MikroTik will do it in next updates.

However, still we can do many things automatic so far by Scripting and Scheduling.

Suppose, we have 6 users in a MikroTik. We may do following Script for "expired password".


As Administration policy we thought after 30 days interval need to "expired password". Then we may count following Schedule.


Thanks for reading. Have a nice day!!!


Sunday, August 29, 2021

Cloud backup is just get easier in MikroTik Stable release 6.48.4


Since RouterOS v6.44 it is possible to store MikroTik device's backup on MikroTik's Cloud server. The backup service allows you to upload an encrypted backup file, download it and apply the backup file to your device as long as your device is able to reach MikroTik's Cloud server. Below we can find operation details that are relevant to the IP/Cloud's backup service:

* Free backup slot for each device
* Allowed backup size: 15MB
* Sends encrypted packets to cloud2.mikrotik.com using UDP/15252 and TCP/15252 port

In previous the process was fully CLI based but in recent stable release 6.48.4 it gets GUI support in Winbox. It is now available in Winbox Files>Cloud Backup


As MikroTik use it's own Cloud Server and uploaded file can only be Encrypted and now available with GUI. It is much more safe, secure and easy now.

The process is very simple...

Go to Files>Cloud Backup>Upload Backup


If we are doing for the very first time all we need to do..

1. Choose 'Action' "create and upload"
2. 'Name' "Any Suitable Name" [A better choice for name could be device Identity]
3. 'Password' "A Strong Password"

and finally press Start.


After  the process start it will take a very short time to create Backup File and Upload, if no error happened. "Status" will inform the Success or Error report.


Now, let's look at the new cloud file. Remember that, yes we are watching the file but that file is not in this device. It is located on MikroTik Cloud.


So, here is the details of that file. We can 'Download' this file in this device and 'Remove' also. But, still downloading process in another device is based in CLI (I hope MikroTik Team, will work on it in next update). Download file will be available in file menu.

As only 1 slot available for each device, to create a new/updated file old one need to 'Remove/Replace' at first.

 Replace could be possible to do also in the process of creating a new one.


Now look at the the file. The significant change is done in the "Secret Download Key". Each time it will be change in the process.


But, knowing this ''Secret Download Key" is essential to download the Backup File in another device. Let's see it.

So, we are moving to another Router and open a Terminal and put following command.

/system backup cloud download-file secret-download-key=GTsWB1h7URm5VfJmiLyzwkK action=download

Thus, the file from the cloud will be download in another device.


So, it is very essential to know the "Secret Download key".

Notes:

1. As it is not .rsc Backup. Mikrotik recommend to restore the backup in same model device.
2. By scripting and scheduling the process could be fully automated and regular basis.
3. As knowing the "Secret Download Key" is important. To do,

Print the information of file on a text file in MikroTik and sending in Email is essential. The command to Print the file is simple.

/system backup cloud print file="File Name"

By scripting and scheduling the whole process can also be automated.
4. The information is also could be shared through API of Bot messenger of Telegram, Whatsapp and so on...

Thanks for Reading and have a nice day!!!

BR,
Shuvodip


Sunday, August 1, 2021

Put your very own sign in MikroTik Teminal


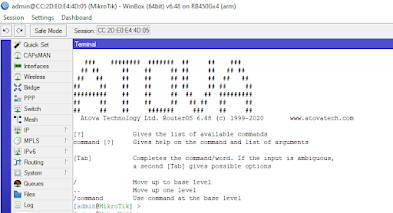
Normally we do not see the Terminal of MikroTik like that. We are actually with very much familiar to this following Terminal.


Yes, this is the very classic MikroTik Terminal. Which comes with MikroTik ASCII Logo and all MikroTik users are very familiar with it. But, you may also change it and put your very own sign as Branding. 

To do it you first need to login in your MikroTik Account. Link: https://mikrotik.com/client

Login if you have account already or register now if you have not. 

After Login you will see in the left side Menu "Branding maker" as given picture.


Click it, it will open another page just like followed.


Now, Put your custom information as following.


For Telnet ASCII Logo you can use this link http://www.network-science.de/ascii/ or similar just like pictured. It is very easy.

Copy that custom created ASCII Logo and paste it and paste it in MikroTik Branding maker "Telnet ASCII Logo" section.

Note: Make sure it is not wider than the form above, or your logo will be distorted.

Now, go little bit down as illustrated. You will find make button. There are 2 options. One for comparatively new RouterOS and another is for older one. As mine was new, I selected the 1st option. You have to do as your one.


Then the custom branding package will be created with .dpk file extension. Now, download this file.


Now, as package is ready, it's time for installation. Login to your MikroTik through Winbox. As like other package installation in MikroTik follow these 2 simple steps. 

=> Upload the package in Files section of MikroTik.

=> Then reboot the system for installation.


After successful reboot, login again and open Terminal. Now, you are watching your Brand Sign with a happy smile. 😀😀😀 


Just not the ASCII logo but you may also can do change in followings by Branding package.

1. Webfig login page

2. Webfig logo

3. /hotspot

4. /skins

5. LCD logo

Where you can put your very own Brand sign. Default configuration can also be edited as like Flashfig through Branding package.

Wednesday, July 21, 2021

An out of the box solution with PoE-out of MikroTik (বাংলা ভার্সন)


শৈশব, স্কুল, কলেজ এবং বিশ্ববিদ্যালয়ের সময় যাকে জীবন মনে হয়। কর্মজীবনে পরিণত বয়সের দায়িত্বে তাকে জীবন-যুদ্ধ বলে অনুধাবন হয়। জীবনের এই যুদ্ধে কিছু সময় আসে যখন চিন্তাকে  নিয়ে যেতে হয় একবারে Out of the Box।

আমাদের এই গল্পটিও অনেকটাই সেরকম, কেন্দ্রীয় চরিত্র সোহাগ হলো "ক" নামক একটি ছোট কোম্পানির আইটি পারসন। কোম্পানির নেটওয়ার্ক সম্পূর্ণ Cable দিয়ে করা, কোনো Wi-Fi নেই।তাদের মালিকের হঠাৎ ইচ্ছা হলো কেবল তার রুমে Wi-Fi ব্যবহার করবে। তো মালিকের কথা মতো সোহাগ একটি Wi-Fi Access Point নিয়ে আসলো বাজেট এর ভিতরে। Wi-Fi Access Point টি  Ceiling Mount করা যায় এবং এর সাথে  56 volt এর  PoE Injector আছে, যার মাধ্যমে একই Ethernet Cable দিয়ে  Power + Data পাঠানো যায়  Wi-Fi Access Point টি তে। তো এমনি করে  Wi-Fi Access Point টি up হলো, এবং বেশ ভালো ভাবেই চলছিল। 

কিন্তু কিছুদিন পরে এলো নতুন চাহিদা, রাত ৮ টার  পর Wi-Fi Access Point টি বন্ধ করে দিতে হবে। শুক্রবার সহ অন্যান্য ছুটির দিনেও একই। বলে রাখা ভাল এই অফিস এতই ছোট, এতে কোন পিয়ন নেই। মালিক অনেক সময় সন্ধ্যা ৬ টার পর অফিসে থাকে, আর তাকে  Wi-Fi Access Point টি বন্ধ করে দেওয়ার অনুরোদ করাও অসম্ভব। 

৬ টায় যখন অফিস ছুটির পর সবাই বাড়ির উদ্দেশে যাত্রা করে, সোহাগকে অপেক্ষা করতে হয় কখন ৮ টা বাজবে, সে Wi-Fi Access Point টি বন্ধ করে বাড়ি ফিরবে। তাই এর সমাধান খুজতে শুরু করলো সোহাগ। 

Wi-Fi Access Point টিতে NTP based Wi-Fi Scheduler আছে কিনা খুজলো। যেহেতু Wi-Fi Access Point টি Budget figure ছিল এমন সুবিধা এতে পাওয়া গেল না। উপরন্তু, মালিক এর সোজা কথা Wi-Fi Access Point টি বন্ধ থাকতে হবে। SSID broadcast হল কিন্তু Internet  পেল না, এমন হলে চলবে না। বন্ধ মানে বন্ধ এবং নতুন করে কোন টাকা দেওয়া হবে না অন্য কোন Wi-Fi Access Point কেনার জন্য। 

এরমাঝে সোহাগ এর মাথায় একটি বুদ্ধি এল। তার অফিসের Router হল MikroTik brand এর, যার ৫ টি পোর্ট। এর মধ্যে ether1 PoE-in, ether5 PoE-out। সে সিধান্ত নিল ether5 থেকে সরাসরি  Wi-Fi Access Point টি up করবে। এরপর Script and Schedule ব্যবহার করে MikroTik থেকে যতটা সম্ভব  Wi-Fi Access Point টি On/Off করার বিষয় টিকে automated করে ফেলবে

বলার অপেক্ষা রাখে না, সোহাগ এর এই চিন্তা বেশ ভালো। কিন্তু জীবন-যুদ্ধে ভাগ্যদেবী সোহাগ এর চিন্তার মতো ভালো না। Wi-Fi Access Point টি ether5 থেকে  PoE-out এর মাধ্যমে Power পেলো না। হতাশ সোহাগ ভাবতে লাগলো সে চাকরি ছেড়ে দেবে, এইভাবে প্রতিদিন অতিরিক্ত ২ ঘণ্টা খরচ করা সম্ভব না। 

কথায় কথায় এই সময় সোহাগ তার এই সমস্যার কথা জানালো তার এক বন্ধু কে যে কিনা একটি IT Solution Provider কোম্পানি তে চাকরি করে। সব শুনে সোহাগের বন্ধু সাহায্য করতে চাইল। জানতে চাইল সোহাগের অফিসের বর্তমান  Network Topology সম্পর্কে। সোহাগ তার বন্ধুকে "অফিসের বর্তমান  Network Topology জানালো

"অফিসের  Network Topology

সোহাগের বন্ধু সব দেখে তাকে কিছু পরামর্শ দিল এবং জানালো এতে তার সমস্যার সমাধান হয়ে যাবে। 

পরামর্শ গুলোঃ

১। প্রথমে সরাসরি connected অবস্থায়  MikroTik এ Login করতে হবে
২। Ether2 তে থাকা অফিসের Internet WAN connection টিকে ether1 এ নিয়ে আসতে যা যা Logical Configuration করতে হয় তা করতে হবে। একই সাথে  ether5 কে এ নিয়ে আসতে যা করার তা করতে হবে
৩।  এরপর Mikrotik এর Power Adapter টি খুলে ফেলতে হবে। আর এরপর থেকে Power Adapter টি ব্যবহার করার দরকার নেই
৪।  56 volt এর  PoE Injector টির Data port থেকে ONU তে এবং Data+Power port থেকে MikroTik Routerএর ether1 port  দুটো ৮ পিনের UTP Cable connect করতে হবে।
৫। এরপর Wi-Fi Access Point টি MikroTik এর ether5 থেকে সরাসরি connect করতে হবে

ব্যাস, এতেই কাজ হয়ে যাবে। 

সোহাগের বান্ধুর পরামর্শে  "ক" অফিসের  Network Topology 


সোহাগের মনে এই পরামর্শে শঙ্কা কাটে নাই, কেননা সে আগেও MikroTik এর  PoE-out port ether5 দিয়ে চেষ্টা করেছে, এবং সেই চেষ্টায় Wi-Fi Access Point টি Power পায় নাইকিন্তু বন্ধুর পরামর্শ সে চেষ্টা করে দেখবে।

অবশেষে, সোহাগ পরামর্শ অনুযায়ী সব করলো। করার পর সে অবাক এই চেষ্টায়  Wi-Fi Access Point টি Power পেলো এবং সব ঠিক মতো কাজ করছে। সোহাগ সাথে সাথে তার বন্ধু কে ফোন দিল জানাতে এবং জানতে আসলে কি কারনে এই চেষ্টায় কাজ করছে। সোহাগ এর বন্ধু তাকে জানালো এখন সে তার অফিসের কাজে একটু  Busy, অফিস ছুটির পর বিকালের চা এর আড্ডায় সব জানাবে। এইদিকে আজ সোহাগের তর সহ্য হয় না, যদিও এতদিন সে রাত ৮ টায় অফিস থেকে বের হয়েছে এবং আজ ৬ টা বাজে সবার সাথে বের হবে। কিন্তু আজ এই ৬ টাকে সুদীর্ঘ প্রতীক্ষা মনে হচ্ছে।

যাইহোক, সেই চায়ের আড্ডার সময় অবশেষে এলো। সোহাগের বন্ধু তাকে বলল কেন এইবারের চেষ্টায় এটি কাজ করলো। সোহাগের বন্ধুর মতে “ক” অফিসের সমস্যা টা ছিল এটাতেই।  Wi-Fi Access Point টির Power এর জন্য দরকার 


"ক" অফিসের MikroTik মডেল টি হল MikroTik hEXs
যার বিস্তারিতঃ https://mikrotik.com/product/hex_s

PoE-out এর এইবারের সফলতা লুকিয়ে আছে Powering System এর ভিতরে। 

 
MikroTik hEXs কে দুই ভাবে Power দেয়া যায়  DC jack আর PoE-in। দুই ভাবেই সর্বনিম্ন 12 volt সর্বোচ্চ 57 volt এ এটি operetional থাকবে। বলে রাখা ভালো, এই মডেল টির সাথে যে DC Power Adaptar টি আসে তা হয়  24 volt এর। 

এখন আসা যাক  PoE-out এর ব্যাপারে। 

এর  Power 500 mA বা 0.5 Ampere। PoE-out টি হচ্ছে Passive PoE যা 57 volt পর্যন্ত দিতে পারে। যেহেতু এটি Passive PoE, তো তাই এর মাঝে যে  voltage আছে  PoE-out দিয়ে সেই voltage ই যাবে।

সোহাগের বন্ধুর মতে “ক” অফিসের সমস্যা টা ছিল এটাতেই। Wi-Fi Access Point টির Power এর জন্য দরকার 56 volt, অথচ 24 volt এর DC Power Adaptar থেকে MikroTik এ ছিল 24 volt। তো স্বাভাবিক ভাবেই  24 volt PoE-out দিয়ে যাচ্ছিল। যা Wi-Fi Access Point টির জন্য যথেষ্ট ছিল না। তাই সোহাগের বন্ধু সোহাগকে 56 volt এর  PoE Injector টি দিয়ে PoE-in এর মাধ্যমে  MikroTikটা তে  Power দেয়ার পরামর্শ দিয়ে ছিল। 

ঘটনা একই হত, যদি  DC Power Adaptar টি 24 volt এর বদলে 56 volt হতো। কিন্তু “ক” অফিস তো আর নতুন করে টাকা খরচ করতে রাজি নয়। 

সোহাগের বন্ধুর মতে, শতকরা ৯০ ভাগ ক্ষেত্রে মানুষ এটা না জানার কারনে MikroTik Router এর  PoE-out feature টি ব্যবহার করতে পারে না। তাছাড়াও  Ampere এর বেশ-কমের কারনে ব্যবহার সম্ভবপর হয় না।

ভাগ্যদেবী এই ক্ষেত্রে সহায় এইবার এমনটি হয় নাই।

Saturday, July 10, 2021

Configure VPN client in Windows through PowerShell


We use PPTP, L2TP, L2TP/IPsec with Pre-shared Key type Dial-Up or Remote Access VPN in our Windows commuter. To Configure casually we use Network & Internet settings or Network and Sharing Center as adding a new adapter.

For Remote Access VPN keeping login credentials complex as much as possible is certainly a good practice. That is the thumb rule for VPN administration part but while a user need to configure it in his Windows PC/Laptop the complex credentials become a hurdles to create and type in GUI.

 In that case, using PowerShell is great. Command Line editing/modify in Notepad and a single shot to Powershell will do all. Here it is...

For PPTP or L2TP:

Open a Notepad first and then modify following command with your information.

Add-VpnConnection -Name "Test-PPTP" -ServerAddress "118.179.210.210" -TunnelType "Pptp" -RememberCredential -Force | rasdial.exe "Test-PPTP" "test" "1234"

Value Modification:

-Name = Give your desired VPN Name

-Server Address= Give your IP or Domain Name of Remote access Server

-TunnelType= Pptp/L2tp as required

In RAS (Remote Access Server) Dial rasdial.exe the first "" is -Name of the VPN. It need to be as equal given by you already. The second "" is VPN User and third "" is VPN Password.

Let's do a practical for clear understand.


In a MikroTik we create following VPN. VPN information is as followed.

VPN Type: PPTP

VPN Server IP: 118.179.210.210

VPN User: test

VPN Password: 1234

Now we run the command in Powershell.

After that our VPN is configured and already dialed for connect and successfully connected.

We connected it by "RASDIAL", it can not store the VPN User & Password info for future use and also users in future will use it from GUI.

So, lets disconnect this connected VPN now. Then click the Advanced options.


Then click Edit to edit the VPN info.

We just need to retype the Password as it is encrypted. Typing 1234 as given on information. Finally, click Save.

Thus, our VPN is ready for future use in GUI.

For L2TP/IPsec with Pre-shared key:

It is as same as all procedure like PPTP/L2TP just in command there is a modification.

Add-VpnConnection -Name "Test-L2TP" -ServerAddress "118.179.111.2" -TunnelType "L2tp" -L2tpPsk "Test2Hack" -RememberCredential -Force | rasdial.exe "Test-L2TP" "test" "1234"

As the VPN with Pre-shared key so in command -L2tpPsk added.

Value Modification:

-L2tpPsk = Give your desired Pre-shared Key.

Rest all are same to configure as demonstrated for PPTP/L2TP.


Tuesday, July 6, 2021

WireGuard VPN with MikroTik


Finally, MikroTik started supporting WireGuard in development channel RouterOS version 7.1beta2. WireGuard is now mostly using rather than any VPN (Virtual Private Network) for Performance and speed, Easy configuration, cross-platform use and Security.

The VPN client of WireGuard is available for almost every cross Platform.

Download Link: https://www.wireguard.com/install/

WireGuard® is an extremely simple yet fast and modern VPN that utilizes state-of-the-art cryptography. It aims to be faster, simpler, leaner, and more useful than IPsec, while avoiding the massive headache. It intends to be considerably more performant than OpenVPN. WireGuard is designed as a general purpose VPN for running on embedded interfaces and super computers alike, fit for many different circumstances. Initially released for the Linux kernel, it is now cross-platform (Windows, macOS, BSD, iOS, Android) and widely deployable. It is currently under heavy development, but already it might be regarded as the most secure, easiest to use, and simplest VPN solution in the industry.

 Why WireGuard?

# Simple & Easy-to-use
# Cryptographically Sound
# Minimal Attack Surface
# High Performance
# Well Defined & Thoroughly Considered
# Most Significantly Fast


Read Comparison of VPN protocols to know more. in here.

As a fact, users request was to MikroTik support for WireGaurd. MikroTik showed respect to the users request and it is now in development phase and hopefully soon it will also be released as Stable for production.

Configure WireGaurd in MikroTik

We will configure as Dial-UP or RAVPN VPN but WireGaurd for sure can be used as Site to Site VPN also. For this configuration, we need a MikroTik Router which is already configured with RouterOS version 7.1beta2 for WAN. That means...

• External IP/ WAN Public IP is configured.
• Default Route is configured.
• DNS configured.
• RouterOS upgraded to at least RouterOS version 7.1beta2.

Now at first, we will create WireGaurd Interface. To do it in MikroTik through Winbox.
 
Wiregaurd>Wiregaurd>Add


We will change the default Listen Port: 13231 to 54321. It may also be run with default port but it is a good practice. Then,
 
Apply>OK

Private & Public Key will be automatically generated.


Now, we will assign address for WireGaurd Interface.

IP>Addresses>Add

For our configuration we add 192.168.0.1/24. From this block Dial-UP or RAVPN client will get IP Address.


We also need to NAT this Private IP Block over Public IP. Thus, we will receive Internet after VPN connected.

IP>Firwall>NAT>Add


Thus, our WireGaurd VPN server in MikroTik configuration is complete.

To add client, we will configure client at first. For this, we will use Windows Platform as client. More client configuration is available in WireGaurd Website.

We already download the Windows client software installer from the link and installed it. Now, it is time to open it.


Now Add Tunnel>Add empty tunnel or Ctrl+N


Create New Tunnel TAB will be open with Auto Generated Public & Private Key.


Now need to Open a “Note PAD” and copy-paste Interface and Private Key value. Thus, we will be able to configure the Interface and PEER for the client.


PEER Public Key is the WireGaurd Interface Public Key and Endpoint is the WAN IP and Listen Port of WirGaurd-MikroTik. Interface Address is 192.168.0.2/24 as we used in MikroTik 192.168.0.1/24 already and for DNS using Google Global DNS. You are also inspired to use your ISP DNS.


After give save, Client part will be done. Now need to configure MikroTik Peer. All we need information from client interface Public Key. Let’s copy it and go back to MikroTik.


Wiregaurd>Peers>Add

All we need to Allowed Address and provide Public key which we already copied from Client Interface. In our case we allowed all IPv4 addresses. 

Then Apply>OK

Now all we need to Dial/Activate VPN from Client side. So, we again back to Client Software.


While it will be Activated Traffic will start to Transfer. As well as logs will be generated.

In MikroTik WireGaurd Interface will show Traffic and in PEER end point we will find the IP where it is connected from.


Reference:


BGP Peer Open-Sent issue in MikroTik and a Solution by BGP monitor

The “Open-Sent” state in BGP (Border Gateway Protocol) indicates that the router has sent an OPEN message and is waiting for an OPEN message...